 Save
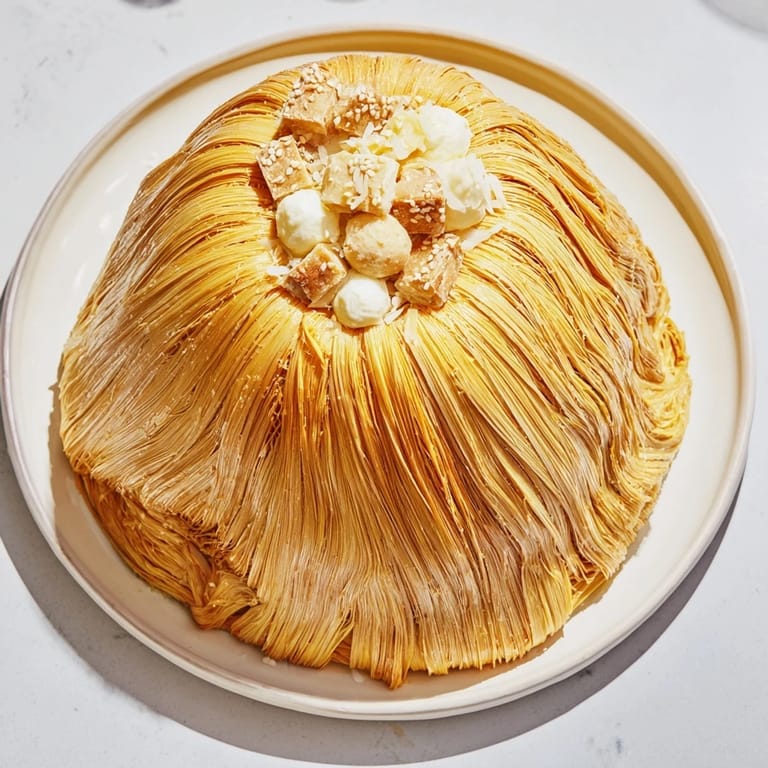
Save The first time I attempted an edible centerpiece, I was hosting a dinner party for people whose taste in food intimidated me a little. I wanted something that felt ambitious but approachable, and I remembered watching someone arrange breadsticks into a delicate cage at a restaurant years ago. That image stuck with me, so I decided to try it at home, filling the interior with a careful selection of cheeses that felt like secrets being shared. The whole thing came together in my hands in a way I didn't expect, and when my guests saw it, their faces lit up in that particular way that happens when food becomes a conversation piece.
Years later, I made this for a small gathering on a winter evening when the light was fading early and everyone arrived a bit tired from their week. I remember standing in the kitchen, rolling out breadsticks while someone opened wine in the next room, and realizing that this dish had a quiet way of slowing things down. By the time I assembled the dome, the room had filled with anticipation, and the cheese course became the heart of the evening rather than an afterthought.
Ingredients
- All-purpose flour: This is your foundation, and it needs to be measured with a light hand—spoon it into the cup and level it off rather than scooping directly from the bag, which always adds too much.
- Instant dry yeast: Check the expiration date; stale yeast leads to stubborn, lazy dough that won't rise properly.
- Lukewarm water: This is crucial—water that's too hot kills the yeast, while cold water means the dough barely budges during rising.
- Olive oil: Use something good enough to taste, because the oil becomes part of the flavor and texture of the breadsticks.
- Triple-cream Brie: This melts into almost nothing, so it becomes a silky anchor for the other cheeses around it.
- Aged Comté: The nutty sweetness here balances the sharpness of blue cheese and the earthiness of goat cheese.
- Truffled goat cheese: Shape these into small balls while you have cold hands—the shape helps them stay distinct within the arrangement.
- Blue cheese: Crumble it just before assembling so it stays textured rather than turning into paste.
- Parmigiano Reggiano: Use a vegetable peeler to create long shards that catch light and add visual drama to the dome.
- Sesame seeds: These toast slightly during baking and add a subtle nuttiness that catches people by surprise when they bite into a breadstick.
Tired of Takeout? 🥡
Get 10 meals you can make faster than delivery arrives. Seriously.
One email. No spam. Unsubscribe anytime.
Instructions
- Bring the dough together:
- Combine your dry ingredients, then add water and oil all at once. Mix until shaggy, then knead for 8 to 10 minutes—your hands will tell you when it's ready because the dough will feel smooth and slightly elastic, no longer resisting your touch.
- Let it rise:
- Cover the bowl with a damp towel and find the warmest spot in your kitchen, perhaps near a window or the back of the stove. You're looking for the dough to roughly double in size, which typically takes 30 minutes on a warm day and might stretch to 45 on a cooler one.
- Shape and glaze:
- Preheat your oven and line a tray with parchment paper. Divide the dough into 18 to 20 pieces and roll each one into a thin stick about 3 mm thick and 25 cm long—the repetitive motion becomes almost meditative. Brush lightly with egg yolk mixed with a splash of water, then scatter sesame seeds across them if you like.
- Bake until golden:
- Slide the tray into a 200°C oven and bake for 15 to 18 minutes, turning the sticks halfway through so they brown evenly. They should be golden and crisp, not pale or soft.
- Arrange the cheese base:
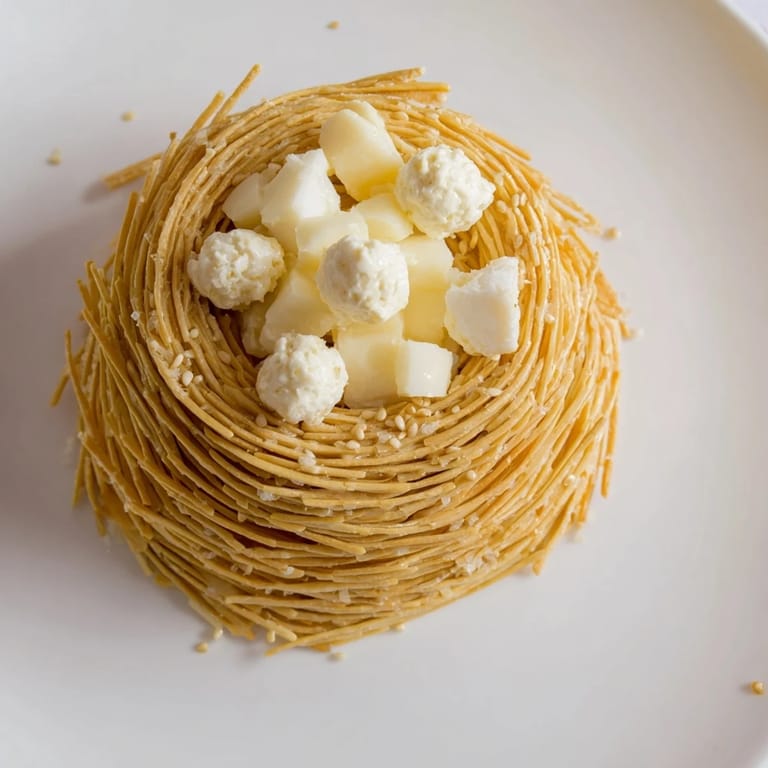
- While the breadsticks cool, pile the cheeses into a mound on your serving platter, varying the heights slightly so the arrangement feels organic rather than engineered. Nestle grapes into the gaps, drizzle honey over everything, and scatter fresh herbs so they catch light.
- Assemble the dome:
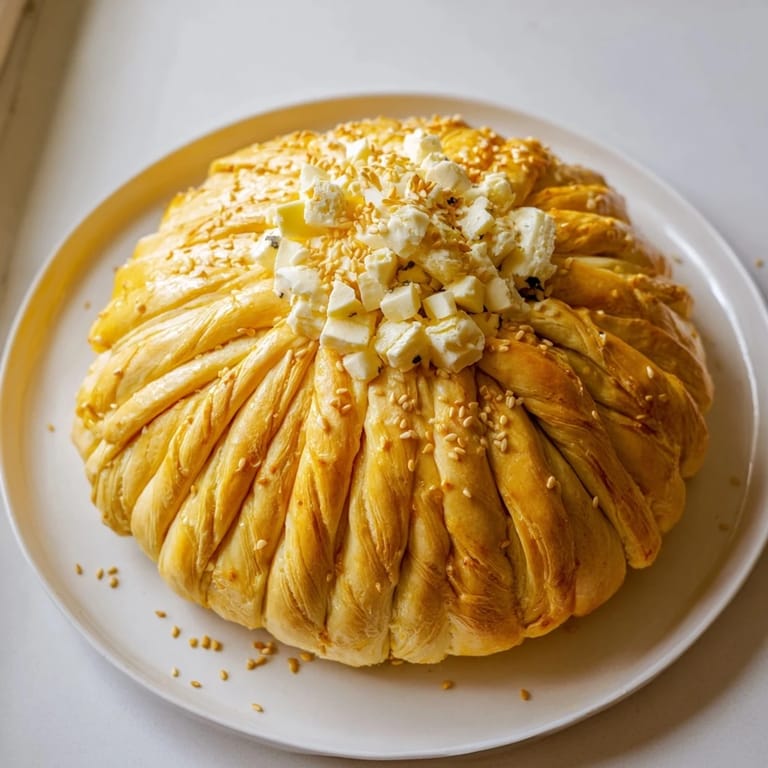
- This is where patience matters more than precision. Stand each breadstick at an angle, leaning them against the cheese pile and each other so they form a cage. If they're too unstable, use a small bowl as a temporary base mold while you build, then slip it out carefully once the structure holds.
 Save
Save The moment when the dome is finally complete—when you step back and see what looked like separate ingredients transformed into something architectural and beautiful—never gets old. It's one of those dishes where the cooking becomes an event, and the eating becomes secondary to the revelation of opening up that cage and discovering what's inside.
Building the Structure
Assembling the dome requires a different kind of attention than most cooking. You're not following a precise formula; you're balancing weight, angle, and the natural irregularities of handmade breadsticks. The key is to work slowly and adjust as you go, leaning each stick against its neighbors until they support each other like a carefully choreographed lean. If one breadstick feels weak, rotate it slightly or press it a millimeter deeper into the cheese below. This isn't surgery—it's more like stacking stones, where small adjustments make the difference between graceful and precarious.
Cheese Selection and Substitutions
The specific cheeses I've listed create a conversation within the dome—creamy against sharp, earthy against bright—but this is your moment to build your own narrative. Think about contrast: soft cheeses need an anchor of something aged or crumbly, and one memorable flavor needs to cut through the richness. Aged cheddar works beautifully in place of Comté, Manchego brings a slightly sweet minerality, and Taleggio adds an earthiness that some people find intoxicating. The rule is simple: choose at least one cheese that makes you happy, one that surprises you, and one that grounds everything else. Taste as you go, and if something feels overwhelming, balance it with something milder.
Serving and Timing
This dish prefers to be served at room temperature, which means you can assemble it up to two hours ahead and let it live on your table as a centerpiece before anyone eats it. That transition from decoration to food is part of the magic. Pair it with something effervescent—a crisp white wine, Champagne, or even sparkling cider if that's your style—because the acidity cuts through the richness of the cheeses and the butter in the breadsticks in a way that feels celebratory.
- For added visual drama, brush a few breadsticks lightly with edible gold leaf before they cool completely so it catches the glaze and adheres.
- If you're serving this at a party, assemble it about 30 minutes before guests arrive so it's still slightly warm and the aromas are at their peak.
- Keep a small knife nearby for guests to use in breaking apart the breadsticks and helping themselves to cheese, turning the whole thing into an interactive moment.
 Save
Save This is the kind of dish that reminds you why you cook: not just to nourish, but to create moments where beauty and flavor and the simple act of eating together become indistinguishable. Once you've made it once, you'll find yourself making it again, each time with slight variations and each time discovering something new in the combination.
Kitchen Help
- → How can I ensure the breadsticks are crisp?
Knead the dough until smooth and elastic, then bake until a golden color appears and they sound hollow when tapped. Let cool completely before assembly.
- → What cheeses work best for this dome?
A mix of creamy, aged, and strong-flavored cheeses like Brie, Comté, truffled goat cheese, blue cheese, and Parmigiano Reggiano creates a balanced flavor profile.
- → Can I prepare the breadsticks in advance?
Yes, bake the breadsticks ahead of time and store them in an airtight container. Assemble the dome shortly before serving for best freshness.
- → How do I assemble the breadstick dome?
Arrange cheeses in a mound at the center of a platter, then carefully build the breadsticks around and over the cheese, gently pressing them for support.
- → Are there ways to customize the dome’s presentation?
Yes, garnish with fresh herbs, grapes, or drizzle honey or fig jam. For dramatic flair, edible gold leaf on breadsticks adds luxury.