 Save
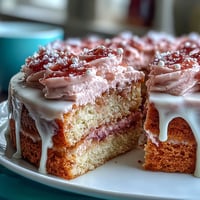
Save My friend texted me a photo of a strawberry ombré cake she'd seen online, and I knew immediately I had to make it for our Valentine's Day gathering. There's something about that gradient of pink—from deep blush to pale rose—that felt like the perfect way to celebrate without being over the top about it. I'd made plenty of cakes before, but this one seemed to demand a little extra care, a little extra magic. The vanilla cake itself is straightforward enough, but it's the buttercream that steals the show, with real freeze-dried strawberries ground right in. It turned out to be one of those desserts that looks like it took hours but actually comes together in a manageable afternoon.
I brought this cake to a potluck at work, and watching people's faces light up when I set it down felt ridiculous in the best way. One coworker asked if I'd ordered it from a bakery, and I remember feeling that quiet pride of knowing I'd actually made something that looked professional. The vanilla cake is tender enough that it practically melts on your tongue, and the strawberry buttercream has this subtle tartness that keeps it from tasting like pure sugar. That's when I realized this wasn't just a pretty cake—it was genuinely delicious.
Ingredients
- All-purpose flour: The foundation of your cake, and room-temperature ingredients (including the eggs and milk) are crucial for a tender, even crumb.
- Baking powder: This is your leavening agent, and measuring it precisely matters; too much and your cake tastes metallic, too little and it stays dense.
- Unsalted butter: Using unsalted lets you control the salt level and gives you that pure, rich flavor without hidden sodium.
- Granulated sugar: This creams with the butter to create air pockets that make the cake light and fluffy.
- Eggs: They must be room temperature or they won't incorporate smoothly, and that's when you end up with a grainy, unpleasant texture.
- Vanilla extract: Use pure vanilla, not imitation; it makes a subtle but noticeable difference in the final taste.
- Whole milk: Room temperature milk blends seamlessly into the batter without shocking the warm butter mixture.
- Powdered sugar: Sift it before measuring to break up any lumps; unsifted powdered sugar is basically compacted and will throw off your buttercream texture.
- Freeze-dried strawberries: Ground finely, they give you genuine strawberry flavor and a hint of texture without adding moisture that would compromise the buttercream.
- Heavy cream or milk: Just a touch loosens the buttercream so it spreads smoothly and pipes beautifully.
- Pink gel food coloring: Gel holds its color better than liquid food coloring and won't water down your buttercream like drops would.
Tired of Takeout? 🥡
Get 10 meals you can make faster than delivery arrives. Seriously.
One email. No spam. Unsubscribe anytime.
Instructions
- Prep your pans and preheat:
- Set your oven to 350°F and grease those three 8-inch pans generously, then line the bottoms with parchment paper. This matters because it's the difference between a cake that slides out cleanly and one that sticks.
- Mix your dry ingredients:
- Whisk together flour, baking powder, and salt in a medium bowl, breaking up any small lumps as you go. This distributes the leavening evenly so your cake rises uniformly.
- Cream butter and sugar:
- Beat your room-temperature butter and sugar together on medium-high for about 3 minutes until it's pale, fluffy, and looks almost mousse-like. You'll hear the mixer working hard, and that's exactly what you want.
- Add eggs and vanilla one at a time:
- Drop in each egg individually and make sure it's fully incorporated before adding the next one, then mix in your vanilla extract. Rushing this step means you'll end up with a greasy, broken-looking batter.
- Alternate flour and milk gently:
- Add a third of the flour mixture, then half the milk, then another third of flour, then the rest of the milk, then the final third of flour, mixing on low speed until just combined. Over-mixing at this stage toughens your cake.
- Divide and bake:
- Distribute the batter evenly among your three pans—I use a kitchen scale for this to be sure they're equal—and smooth the tops. Bake for 25 to 30 minutes until a toothpick comes out clean, and your kitchen will smell incredible.
- Cool with patience:
- Let the cakes sit in their pans for 10 minutes (resist the urge to turn them out immediately), then turn them out onto wire racks to cool completely. Patience here prevents a warm, fragile cake from falling apart.
- Make the strawberry buttercream:
- Beat softened butter until it's creamy, then gradually add your sifted powdered sugar a bit at a time, mixing in your finely ground freeze-dried strawberries, cream, vanilla, and salt. The whole thing should become smooth, fluffy, and a pale pink color.
- Create your color palette:
- Divide the buttercream into three bowls—leave one plain (the lightest), add a tiny drop of pink gel coloring to the second, and add more coloring to the third for a deeper shade. Gel coloring is forgiving, so you can adjust gradually until you love the shades.
- Assemble the layers:
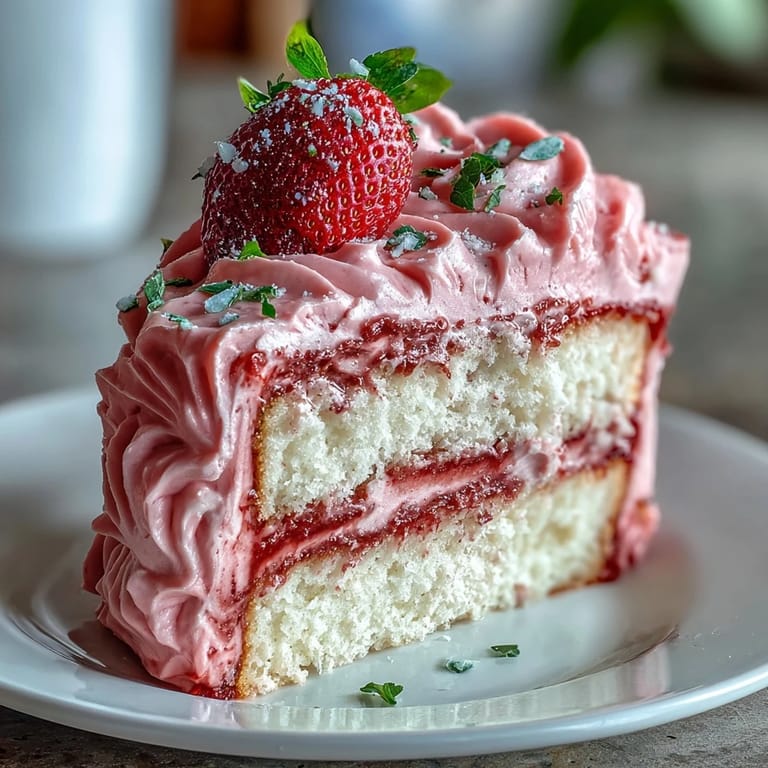
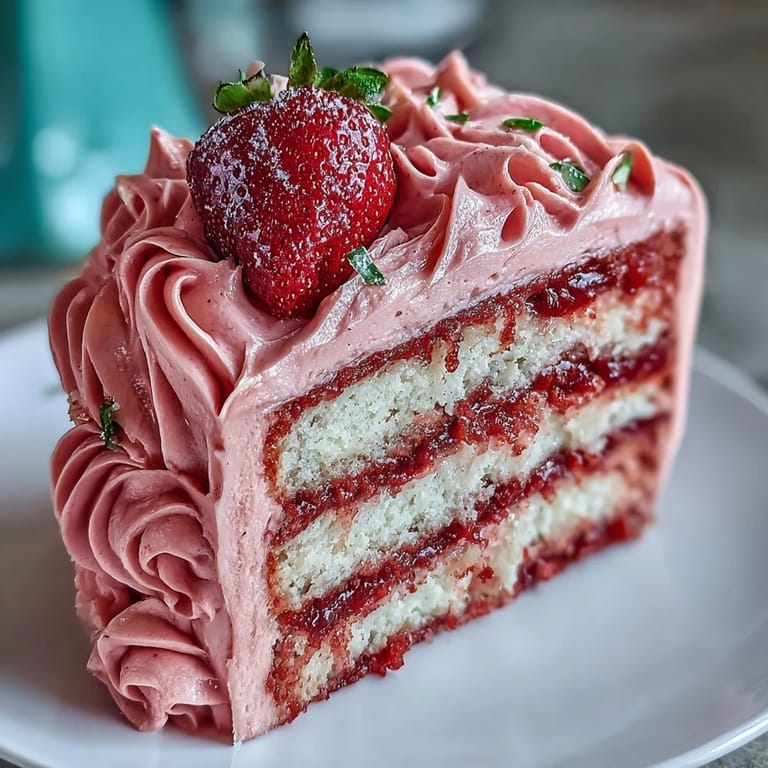
- Place your first cake layer on a serving plate, spread a layer of the lightest buttercream on top, then stack the second layer and spread the medium pink buttercream, and finally the third layer with the darkest pink. If your layers are domed, level them off with a serrated knife first.
- Create the ombré effect:
- Start at the bottom of the cake and spread the darkest pink buttercream around the bottom third, the medium pink in the middle section, and the lightest pink on top. Use an offset spatula to gently blend where the colors meet, creating that beautiful gradient.
- Final touches and chill:
- Garnish with fresh strawberries and edible glitter if you like, then refrigerate the whole cake for at least 30 minutes before slicing. This sets the layers and gives you clean, beautiful cuts.
 Save
Save I still think about the moment my daughter helped me frost this cake for her school bake sale—she was so careful with the ombré blending, and her concentration was adorable. When it sold out within an hour, she understood for the first time that something made with your own hands carries its own kind of magic. It's not just cake; it's time spent, precision practiced, and love visible in layers of pink.
Why Freeze-Dried Strawberries Matter Here
Fresh strawberries in buttercream add too much water and turn everything weepy and separated, which is why I'd tried that approach before with disappointing results. Freeze-dried strawberries, once ground into a fine powder, give you pure strawberry flavor and a subtle tartness that balances the sweetness of the buttercream. They also keep the frosting stable and spreadable, so your ombré edges stay clean and defined instead of sliding all over the place.
The Beauty of Gel Food Coloring
I used to use liquid food coloring for everything until I realized it dilutes buttercream and makes it oily and grainy. Gel coloring changed the game—it's intensely pigmented, so you need just a tiny amount to create vibrant, true colors without compromising texture. A little goes a long way, and you can adjust it gradually, so you won't accidentally overshoot into an unpleasant shade of pink.
Making Ahead and Timing
I've learned that having your cake layers baked and frozen a few days in advance actually makes the whole process less stressful, not more. You thaw them for an hour at room temperature, then assemble with fresh buttercream, which feels more manageable than trying to do everything in one marathon day. The frosting can be made the morning of serving, and the whole assembled cake keeps beautifully in the refrigerator for up to two days, though it's best served fresh.
- Bake your layers up to a month ahead and freeze them wrapped well in plastic wrap; this actually locks in moisture.
- Make the buttercream no more than a few hours before assembly, or it can pick up refrigerator flavors.
- Once assembled, keep the cake refrigerated until 30 minutes before you want to serve it, which helps everything stay structurally sound.
 Save
Save This cake became my go-to for celebrating the people I love, whether it's Valentine's Day or just a Tuesday when someone needs a little sweetness in their life. Every time I make it, it reminds me that good things take time and intention, and the result is always worth it.
Kitchen Help
- → How do I achieve the pink ombre buttercream effect?
Divide the strawberry buttercream into three portions, tint each with pink gel food coloring in progressively deeper shades, then apply from darkest at the bottom to lightest at the top, smoothing gently to blend.
- → Can I prepare the cake layers in advance?
Yes, cake layers can be baked ahead and frozen for up to one month. Thaw completely before assembling and frosting.
- → What ingredients give the cake its moist texture?
The combination of unsalted butter, eggs, whole milk, and vanilla extract creates a tender, moist vanilla cake base.
- → Is it necessary to use freeze-dried strawberries in the buttercream?
Freeze-dried strawberries add concentrated flavor and vibrant color without extra moisture, which helps maintain buttercream consistency.
- → How should I store the finished cake?
Chill the frosted cake to set the buttercream. Store it covered in the refrigerator to keep it fresh and allow flavors to meld.
- → Are there any recommended garnishes for this cake?
Fresh strawberries and edible glitter or sprinkles complement the ombre effect and add festive visual appeal.