 Save
Save The aroma of seasoned beef bubbling on the stove always takes me back to late-night study sessions in college, when my roommate would secretly cook Tex-Mex feastss at 2 AM. We had no business making such elaborate meals between exams, but those crispy, cheese-loaded wraps became our reward for surviving another week of textbooks and stress. Now, making a keto version feels like honoring that memory while keeping my blood sugar happy and my taste buds thrilled. The first time I attempted low-carb crunchwraps, my husband actually asked if I was cheating on my diet, and watching his face when I took that first golden, crispy bite was absolutely priceless.
Last summer, I served these at a backyard barbecue when my keto-skeptical brother visited. He watched me assemble them with that same raised eyebrow he uses when I mention my diet experiments, but after one bite, he demanded the recipe for his wife. The best part was watching my niece sneak a second wrap when she thought no one was looking. These crunchwraps have become my go-to for proving that low-carb eating can be just as indulgent and satisfying as anything else.
Ingredients
- Unsalted butter: Start with cold butter cut into cubes so it melts evenly and prevents the cream cheese from seizing up when you add it
- Cream cheese: Let this come to room temperature for 10 minutes before using, and I learned the hard way that cold cream cheese creates lumpy sauce no matter how much you whisk
- Heavy whipping cream: This creates that velvety restaurant texture, and coconut cream works surprisingly well if you need dairy-free
- Sharp cheddar cheese: Shred it yourself from blocks because pre-shredded cheese has anti-caking agents that make grainy sauce
- Ground beef: The fat content matters here, so I use 85/15 and drain the excess to keep the wraps from getting soggy
- Taco seasoning: Homemade blends let you control the sodium, and I always add a pinch more cumin than recipes call for
- Low-carb tortillas: Mission Carb Balance holds up better than almond flour versions, which tend to crack when you fold them
- Sour cream: Greek yogurt adds extra protein if you are tracking macros, and I honestly cannot tell the difference in the final taste
- Shredded lettuce: Iceberg gives you that classic crunchwrap crunch, but romaine works if you want more nutrients
- Tomato: Remove the seeds and watery center before dicing, or your wraps will get soggy spots that nobody wants
- Extra cheddar cheese: Pepper jack adds a nice kick if you like heat, and it melts beautifully in the hot center
- Cilantro: Fresh parsley saves the day if you are one of those people who think cilantro tastes like soap
- Jalapeño slices: These are optional but honestly recommended because they cut through all the rich cheese and beef
- Olive oil: Avocado oil has a higher smoke point if you are cooking at higher heat, and I keep both oils in my pantry now
Tired of Takeout? 🥡
Get 10 meals you can make faster than delivery arrives. Seriously.
One email. No spam. Unsubscribe anytime.
Instructions
- Make the velvety cheese sauce:
- Melt your butter in a small saucepan over medium heat, watching carefully so it does not brown. Whisk in the room temperature cream cheese until smooth, then pour in the heavy cream while stirring constantly. Add the shredded cheddar gradually, stirring until each handful melts completely into a glossy sauce that coats the back of a spoon.
- Brown the seasoned beef:
- Cook the ground beef in a large skillet over medium-high heat, breaking it apart with a wooden spoon until no pink remains. Drain the excess fat into a heat-safe container, then stir in the taco seasoning until the beef is evenly coated and fragrant.
- Crisp the tortillas to perfection:
- Heat a tablespoon of olive oil in your skillet over medium heat until it shimmers. Fry each tortilla for one to two minutes per side until golden bubbles appear, then transfer to paper towels to drain while you assemble the rest.
- Seal and golden them up:
- Return the skillet to medium heat with a splash more oil if needed. Place each crunchwrap seam-side down and cook for three to four minutes until the bottom is golden brown and sealed. Flip carefully and cook the other side until equally crispy and the cheese inside has melted into gooey perfection.
- Let them rest before serving:
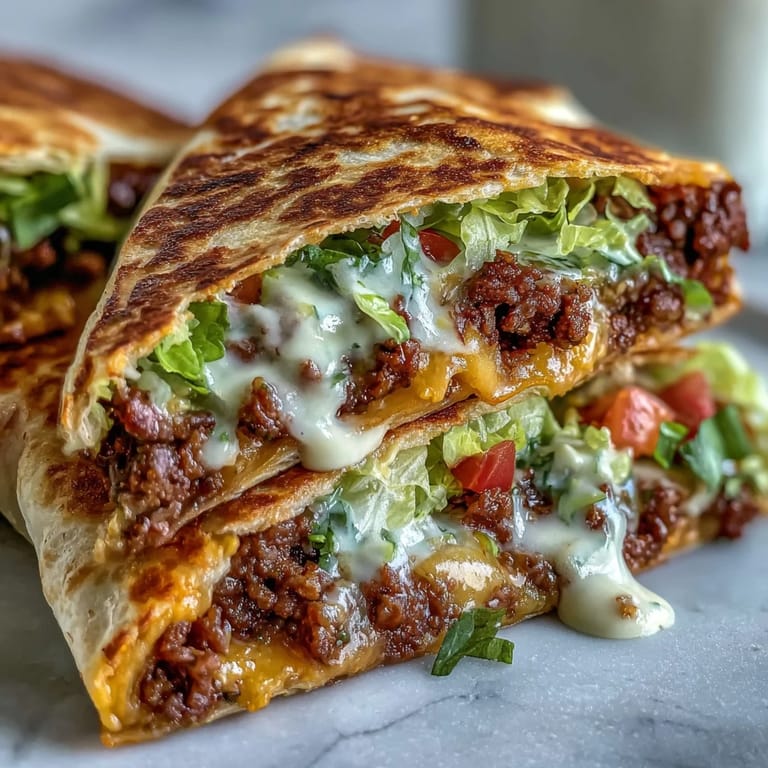
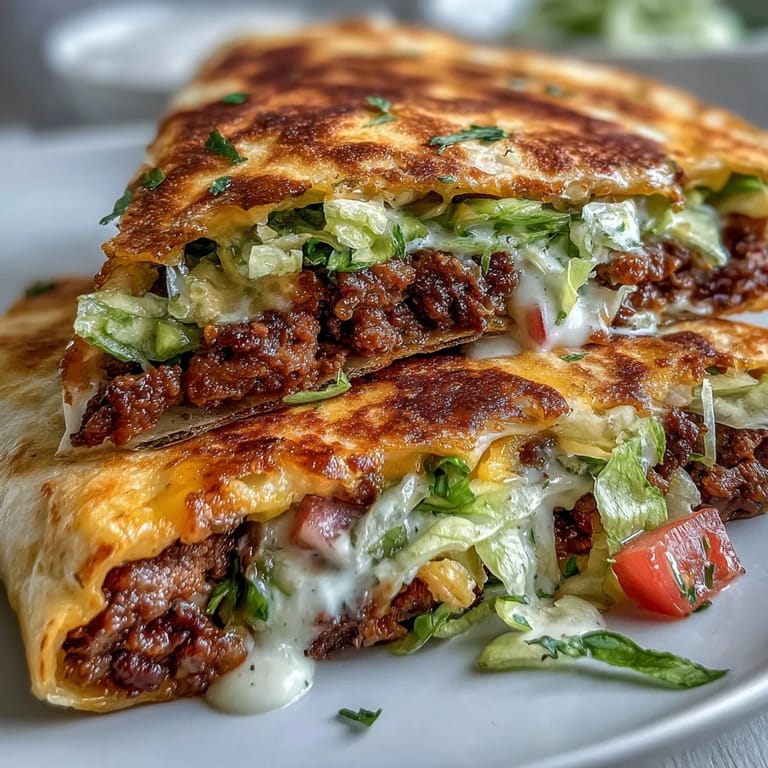
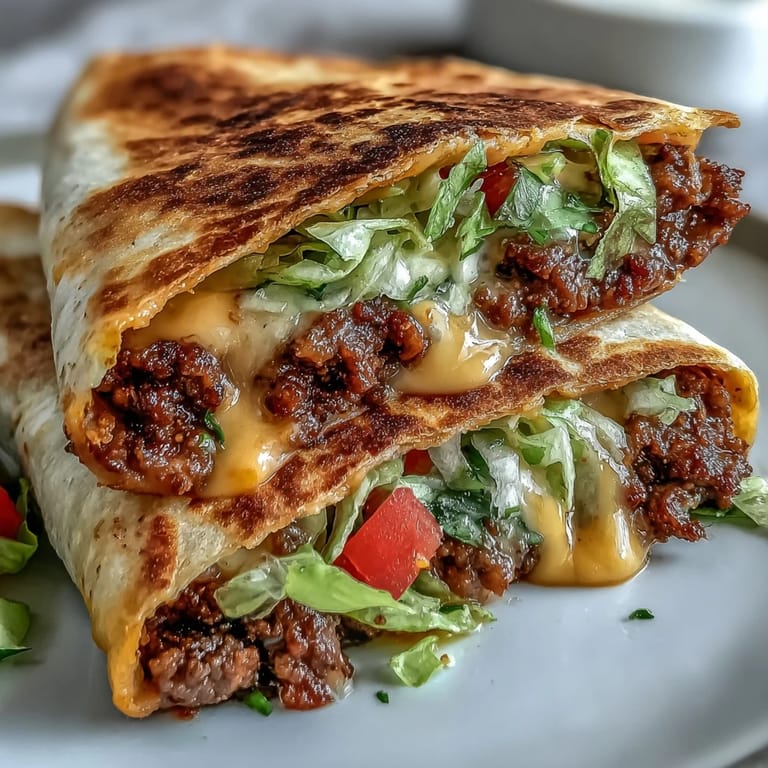
- Transfer the cooked crunchwraps to a cutting board and let them rest for one full minute, which helps the filling set slightly. Slice each wrap in half to reveal those beautiful layers, then garnish generously with cilantro and jalapeño slices while still warm.
 Save
Save My daughter now requests these for her birthday dinner every year, which honestly makes me tear up a little. What started as a guilty college midnight snack has transformed into a family tradition that brings everyone to the table, even the picky eaters who usually turn their noses up at anything labeled keto. Food has this magical way of carrying memories forward while creating new ones.
Make-Ahead Magic
I cook the beef and make the cheese sauce up to three days in advance, storing them separately in airtight containers. The assembly happens so quickly on busy weeknights that I sometimes have dinner ready in less than fifteen minutes. Just reheat the sauce gently over low heat, stirring in a splash of cream if it has thickened too much in the fridge.
Freezer Friendly Stash
Uncooked crunchwraps freeze beautifully for up to two months when wrapped individually in parchment paper and placed in freezer bags. Thaw them overnight in the refrigerator before cooking, and they taste just as fresh as the day you made them. I always keep a stash for those nights when cooking feels impossible.
Serving Suggestions That elevate Everything
A crisp green salad with lime vinaigrette cuts through the richness, and I sometimes serve guacamole on the side for extra healthy fats. If you are entertaining, set up a toppings bar so guests can customize their own crunchwrap experience.
- Warm your serving plates in the oven for five minutes so the wraps stay hot longer
- Extra cheese sauce on the side is never a bad idea, and heated quesadilla style
- These reheat surprisingly well in an air fryer at 350°F for three minutes if you have leftovers
 Save
Save These keto crunchwraps prove that eating low-carb does not mean sacrificing the foods you love, and I hope they become a staple in your kitchen like they have in mine. Every crispy, cheesy bite is a little celebration of flavor and nostalgia that just happens to fit your lifestyle perfectly.
Kitchen Help
- → What makes these suitable for keto?
Using low-carb tortillas significantly reduces carbohydrates compared to traditional flour versions, while the high-fat content from beef, cheese, and heavy cream keeps you in ketosis.
- → Can I freeze assembled wraps?
Freeze before cooking by wrapping individually in plastic, then thaw overnight in the refrigerator before pan-frying for best texture and flavor.
- → How do I prevent filling from leaking?
Keep fillings centered, avoid overstuffing, and ensure the folded edges overlap completely before cooking seam-side down to create a proper seal.
- → What tortillas work best?
Mission Carb Balance or almond flour-based options hold up well during frying—avoid ultra-thin versions that may tear when folded.
- → Can I make the cheese sauce ahead?
Prepare up to 2 days in advance and refrigerate, then reheat gently with a splash of cream while whisking to restore smooth consistency.
- → What proteins can I substitute?
Ground chicken, turkey, or even crumbled pork sausage work beautifully with the taco seasoning for a lighter variation.