 Save
Save The first time I made Easter Nest Cupcakes, I remember the chocolatey aroma blooming through the kitchen as rain pinged against the windows. There was something mischievous about swirling the frosting into little nests, as if setting up a miniature scene for spring to arrive indoors. For a moment, I found myself humming along to a tune from the radio, coaxing my cupcakes into cheerful nests. Oddly enough, the process of balancing out those candy eggs on each one was far trickier than expected. Finishing them, I felt a ridiculous sense of pride staring at my own flock of sugary nests.
Once, I brought a batch of these to a Sunday morning potluck after a quick grocery store run where I almost forgot the candy eggs. My niece insisted on being my official decorator, her tiny hands shaking as she carefully nestled the eggs, and we ended up giggling over who could make the silliest nest. Not only did the cupcakes disappear before anyone tried the main dish, but we sparked an impromptu debate about the 'best' candy egg color combination. That little kitchen chaos made them an instant holiday tradition in our family. Now, there is always a scramble to assemble nests before guests arrive, which only adds to the fun.
Ingredients
- All-purpose flour: This forms the backbone of the cupcakes, and sifting it first makes for a softer crumb.
- Unsweetened cocoa powder: Deepens the chocolate flavor, and I learned to use a good-quality cocoa for a big difference in taste.
- Granulated sugar: Sweetens the cupcakes and locks in moisture for a tender bite.
- Baking powder & baking soda: The combo gives the cupcakes a lovely rise and light texture without being dense.
- Salt: Just a pinch balances all of the rich flavors.
- Eggs: Bring everything together, so bring them to room temperature for a smoother batter.
- Whole milk: Makes the crumb extra moist and flavorful, and don't swap for low-fat if you can help it.
- Vegetable oil: Keeps the cake tender and adds moisture that butter alone can't supply in this recipe.
- Vanilla extract: Enhances the chocolate and gives the cakes a homey scent.
- Hot water: This thins the batter—don't worry if it looks runny, that's the secret to a fudgy result.
- Unsalted butter (softened): The base of your buttercream, and letting it sit out first helps it whip up fluffy and smooth.
- Powdered sugar: Sweetens and thickens the frosting; sift for a lump-free finish.
- More unsweetened cocoa powder: For deep, chocolaty frosting—taste as you mix to get the intensity that's just right for you.
- Milk: Loosens the buttercream to the perfect spreading or piping texture.
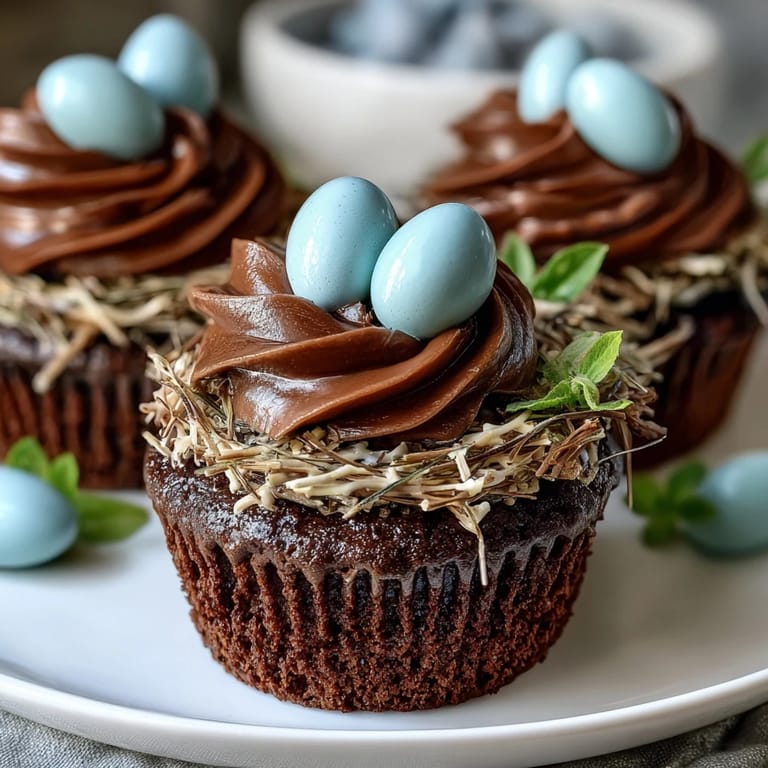
- Candy eggs: The best part! Pick your favorites and resist the urge to eat them all before decorating time.
- Shredded coconut or chocolate sprinkles (optional): Toasting the coconut adds a delightful crunch and a hint of nuttiness to these edible nests.
Tired of Takeout? 🥡
Get 10 meals you can make faster than delivery arrives. Seriously.
One email. No spam. Unsubscribe anytime.
Instructions
- Prep your pans:
- Line your muffin tin with cupcake liners and heat your oven to 350°F so you can fill them as soon as the batter is ready.
- Mix your dry ingredients:
- In your biggest bowl, whisk flour, cocoa, sugar, baking powder, baking soda, and salt until they look evenly colored—watch the dust cloud!
- Blend the wet stuff:
- Crack the eggs into a second bowl, then stir in milk, oil, and vanilla until smooth and glossy.
- Combine and stir:
- Pour the wet mixture over the dry and stir just until you don’t see streaks, then gently fold in the hot water—it should look thin, but that’s what makes them lush.
- Divide and bake:
- Fill each liner about two-thirds full and pop them in the oven for 18–20 minutes; your kitchen should smell like pure chocolate when they're ready.
- Cool completely:
- Set the cupcakes on a wire rack and (seriously) wait, or your frosting will slide right off.
- Whip the buttercream:
- Beat the softened butter, powdered sugar, cocoa, milk, vanilla, and salt until the color is rich and the texture is cloud-like.
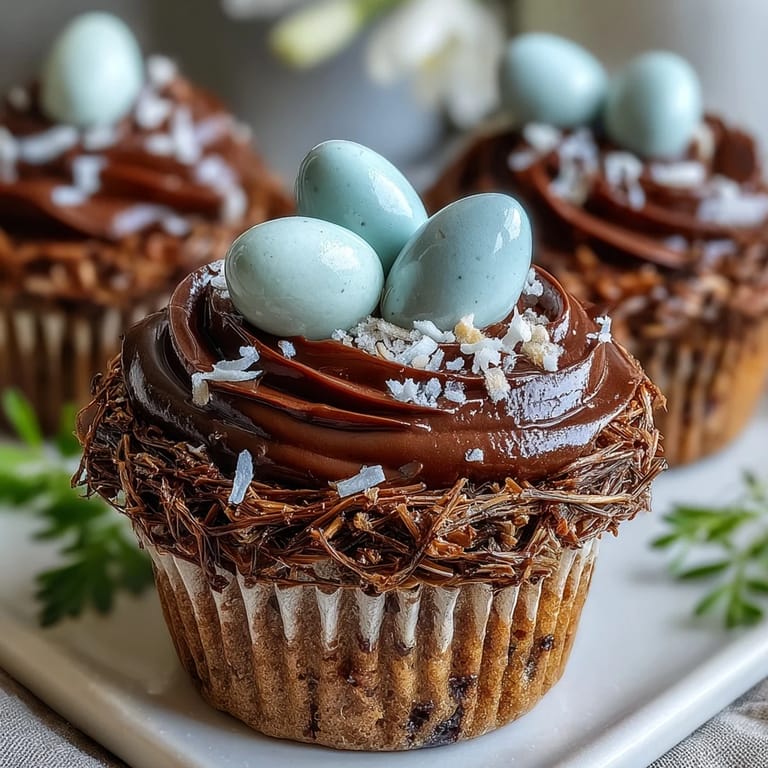
- Create the nests:
- Using a piping bag (or a spoon if you don’t have one), swirl the buttercream onto each cooled cupcake in a rounded nest pattern.
- Decorate:
- Sprinkle with shredded coconut or chocolate sprinkles for texture, then nestle 2 or 3 candy eggs right in the middle.
 Save
Save  Save
Save The afternoon these cupcakes debuted at Easter, my cousin started narrating every step like a wildlife documentary, describing the 'elusive blue egg' as he gently pressed it into the buttercream nest. We all cracked up so much that the whole tray looked a little less perfect but a lot more joyful. That particular batch was devoured in record time, and the story gets retold every spring as the cupcakes return.
Making Your Cupcakes Extra Special
Swapping out milk chocolate eggs for speckled malted eggs brings a crunch and a pop of color that's always a pleasant surprise. For a grown-up twist, I've sometimes stirred a pinch of espresso powder into the batter for a richer, more complex chocolate note. If you toast your coconut, watch it very closely—I've learned the hard way it goes from golden to singed in seconds, so stay nearby and enjoy the warm, nutty aroma as it toasts.
Easter Morning Assembly Line
Decorating these cupcakes often ends up being a group event in our house: you pipe, I sprinkle, someone else arranges the eggs. The kitchen gets delightfully messy and no two nests ever wind up exactly alike, which is half the charm. Sometimes we run a little contest for the most whimsical design—which usually ends with us declaring a tie (and sneaking extra candy eggs from the supply).
Helpful Swaps and Shortcuts
If you're short on time, using a boxed chocolate cake mix with homemade buttercream always fools my friends. For gluten-free, simply use your favorite cup-for-cup blend and keep an eye on bake times since ovens vary just a little. Decorating with chocolate sprinkles instead of coconut makes it allergy friendly for those who can't do nuts either.
- Cool cupcakes fully or your nests will melt.
- Don't overmix the batter—stir just until the flour vanishes.
- Let everyone pick their own candy eggs for a more personal nest.
 Save
Save 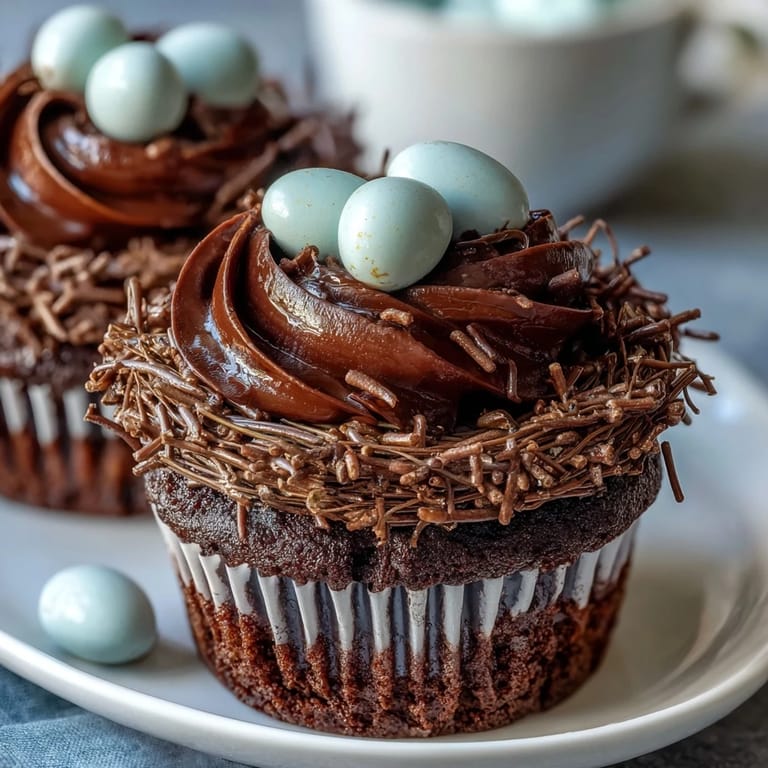 Save
Save Making Easter Nest Cupcakes is truly as much fun as eating them. However you decorate, they're guaranteed to coax out a smile (and maybe a few sticky fingers) from everyone gathered around your table.
Kitchen Help
- → How do I keep the cupcakes moist?
Stir in the hot water at the end of mixing to help create a tender, moist crumb. Don’t overmix once combined, and cool on a wire rack to avoid sogginess from trapped steam. Storing airtight also preserves moisture.
- → Can I substitute dairy in the buttercream?
Yes. Swap whole milk for an equal amount of plant milk (almond or oat) and use a vegan butter or margarine in place of unsalted butter. Adjust liquid to reach the desired frosting consistency.
- → What gives the nest texture?
Shredded coconut or chocolate sprinkles create nest-like texture. Toasting the coconut briefly in a dry pan deepens the flavor and adds a toasty aroma before decorating.
- → How can I make these gluten-free?
Use a 1:1 gluten-free all-purpose flour blend that includes xanthan gum or add it if missing. Bake as instructed but check doneness with a toothpick, as some blends may require a slight time adjustment.
- → What’s the best way to pipe the nest shape?
Use a round piping tip or a fridge-stiffened buttercream and pipe a spiral, then press a shallow well in the center with the tip. Alternatively, spread frosting in a circle and use the back of a spoon to form the nest depression.
- → How should I store and transport these?
Keep finished cupcakes in a single layer in an airtight container in the fridge for up to 3 days, bringing to room temperature before serving. For transport, box them snugly to prevent shifting and add a barrier between layers if stacking.